
In part2 of this series, we defined the models for our blog application. However, aside from python manage.py shell, we don't yet have a way to create and edit blog posts or categories. For this, we need to enable django's admin interface.
Note: this tutorial was written for django 1.3, and is therefore out of date.
If you haven't already done so, enable the admin interface by adding django.contrib.admin to the INSTALLED_APPS setting, and uncommenting the relevant lines in the main project urlconf, mysite/urls.py.
1 2 3 4 5 6 7 8 9 10 11 12 13 14 15 16 17 | from django.conf.urls.defaults import patterns, include, url
# Uncomment the next two lines to enable the admin:
from django.contrib import admin
admin.autodiscover()
urlpatterns = patterns('',
# Examples:
# url(r'^$', 'mysite.views.home', name='home'),
# url(r'^mysite/', include('mysite.foo.urls')),
# Uncomment the admin/doc line below to enable admin documentation:
# url(r'^admin/doc/', include('django.contrib.admindocs.urls')),
# Uncomment the next line to enable the admin:
url(r'^admin/', include(admin.site.urls)),
)
|
Create a file called admin.py in the directory containing the blog app.
First, we need to import the admin module and the models which we wish to add to the admin interface.
1 2 3 4 | # admin.py
from django.contrib import admin
from mysite.blog.models import Post, Tag
|
Next we register our models with the admin site.
6 7 | admin.site.register(Post)
admin.site.register(Tag)
|
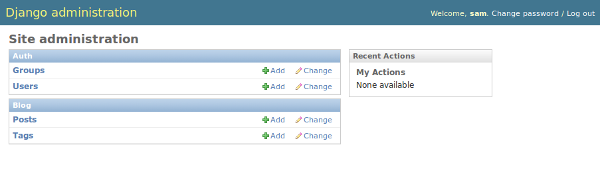
At this point if you start the test server and go to http://127.0.0.1:8000/admin/ you will see that the Post and Tag models have been added.
However, if you create a couple of blog post and then try to view the list of posts, this is what you will see:
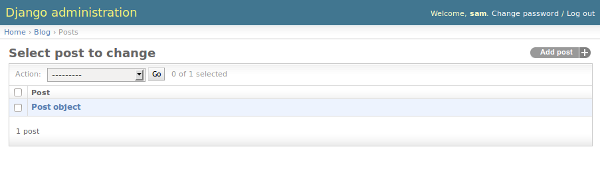
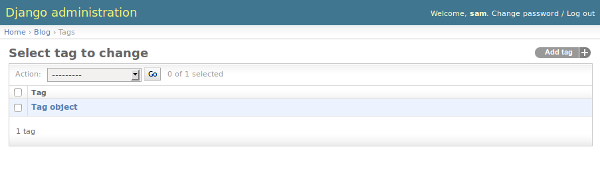
In order to rectify this, we need to add a __unicode__ method to each of our models.
# models.py

class Post(models.Model):
....
    def __unicode__(self):
        return self.title

class Tag(models.Model):
....
    def __unicode__(self):
        return self.name
Finally, we want the admin interface to generate the slug field automatically from the title field. To do this, we add the following lines to the admin.py file.
6 7 | class PostAdmin(admin.ModelAdmin):
prepopulated_fields = {"slug": ("title",)}
|
We then add 'PostAdmin' as the second argument to the call which registers Post with the admin interface.
9 | admin.site.register(Post, PostAdmin)
|
Now you will see that the slug field is automatically filled in when you enter a title for your blog post. Here's the complete code for reference:
1 2 3 4 5 6 7 8 9 10 | # admin.py
from django.contrib import admin
from mysite.blog.models import Post, Tag
class PostAdmin(admin.ModelAdmin):
    prepopulated_fields = {"slug": ("title",)}
admin.site.register(Post, PostAdmin)
admin.site.register(Tag)
|
1 2 3 4 5 6 7 8 9 10 11 12 13 14 15 16 17 18 19 20 | # models.py
from django.db import models
from datetime import datetime
class Tag(models.Model):
name = models.CharField(max_length=20, unique=True)
def __unicode__(self):
return self.name
class Post(models.Model):
title = models.CharField(max_length=120)
slug = models.SlugField(max_length=120, unique_for_date='publication_date')
publication_date = models.DateTimeField(default=datetime.now)
body = models.TextField()
tags = models.ManyToManyField(Tag)
def __unicode__(self):
return self.title
|
That concludes this installment. Next time we'll get to the real meat of the project - using Django's generic class-based views.
